How to install Stable Diffusion WebUI

AUTOMATIC1111’s Stable Diffusion WebUI is one of the most popular applications when it comes to running Stable Diffusion on your own computer. The source code is open and available on GitHub for download and further development.
In this guide, we will look at installing Stable Diffusion WebUI on Windows. I use an NVIDIA graphics card. If you use an AMD graphics card, you can find all the necessary information in the A1111 GitHub repository.
By the end of this guide, you will be able to install Stable Diffusion WebUI on your own computer like an absolute boss!
System requirements
To use Stable Diffusion comfortably on your own computer, it should meet the following requirements:
- Windows (I use Windows 11 but this guide might also apply to Windows 10)
- NVIDIA GPU with at least 4 GB VRAM and current driver (follow these instructions if you have an AMD GPU)
- 16 GB RAM
- at least 10 GB free disk space
- more free disk space, depending on the amount of images you will create
Additionally, you will need Git and Python 3.10 (newer versions are not supported) installed on your computer. You can download them from their official websites and install manually. A much easier way might be simply using winget from a privileged Windows terminal:
winget install Git.Git Python.Python.3.10After installing, verify that you are using the correct version of python in a new, unprivileged Windows terminal:
python -VLeave the terminal open – we will need that for the next steps…
Installation
This section will guide you through installing Stable Diffusion WebUI. If something doesn’t work, please check that you have followed all the previous steps and that no errors have occurred.
Step 1: create an installation directory
First we need a directory into which we will install our program files and extensions as well as the checkpoints, LoRA and other add-ons used.
- create a new directory in a location of your choice (e.g.
%AppData%\sd-webui) - make sure you have full write permissions in the created directory
Step 2: clone the Git repository
In this installation method, we download the program files to our installation directory using Git.
In Windows terminal, make sure you are still in your previously created installation directory and execute the following command (don’t forget the dot at the end):
git clone https://github.com/AUTOMATIC1111/stable-diffusion-webui.git .Git will now download all the required program files from the Git repository. Give it some time and watch our YouTube videos in the meantime…
Step 3: create a Python venv
It is recommended to install the required Python modules in their own isolated environment. This means that our installation has as little influence as possible on the entire environment and can be updated and expanded independently of the system-wide Python installation. We create a virtual environment called “venv” with the following command:
python -m venv venvYou might also want to upgrade pip and the setuptools python module. Always make sure you are using the python binary from the previously created venv:
venv\Scripts\python -m pip install --upgrade pip setuptoolsStep 4: pre-install required python modules
We want to use the CUDA 12.1 compatible versions of PyTorch and xformers. Therefore, we install the required packages before the first start:
venv\Scripts\python -m pip install --upgrade torch torchvision torchaudio xformers --index-url https://download.pytorch.org/whl/cu121Step 5: customize the launch script
As a final step before we launch our AI environment for the first time, we customize the launch script and set the variables valid for our environment. In addition, we add a command for the automatic prior update of the binaries from the Git repository. Open the webui-user.bat file in an editor of your choice and overwrite the entire contents with the following text:
@echo off
set GIT=
set VENV_DIR=venv
set PYTHON=%VENV_DIR%\Scripts\python.exe
set COMMANDLINE_ARGS=--xformers --no-half-vae

echo Updating from Git...
git pull

echo Starting Stable Diffusion WebUI...
call webui.bat
First Launch
After installing and configuring our AI environment, it is now time to launch Stable Diffusion WebUI for the first time. To do this, simply run the previously customized launch script by opening it with a double click. You can also create a desktop link to your script to easily launch the UI in the future.
The script will now install additional required packages and then automatically open the Stable Diffusion WebUI in your default browser:
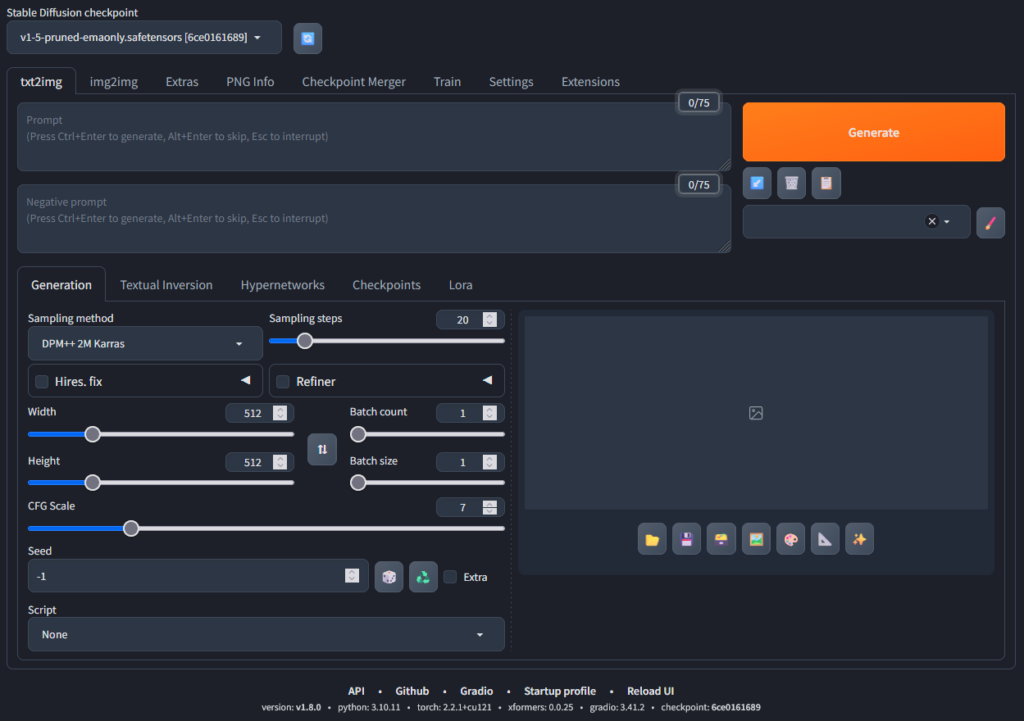
And we are done! For now. Take your time and try out all the functions within the web ui. Feel free to experiment with your own first prompts and create some images. Read our comparison of the top 10 SDXL models and make sure you’ll come back later for more interesting tutorials and articles. Have fun!
How about a tutorial on how to text the YT AI music videos you created?
https://www.youtube.com/watch?v=eiI4H_UU2rk